Kneeling Bench Hip Flexor Stretch
Kneeling Bench Stretch for Instant Hip Relief
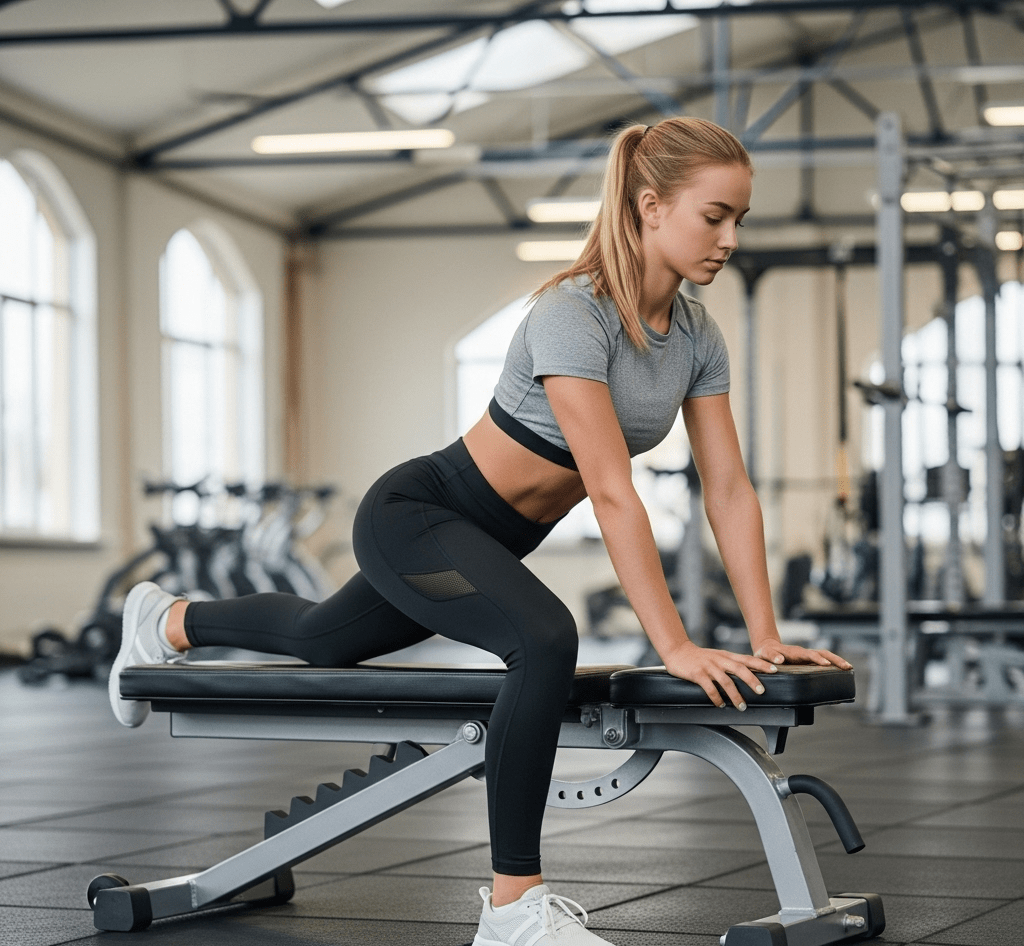
The Bench Lunge Hip Flexor Stretch is a game-changer for anyone battling stiff hips, whether you’re an athlete, desk warrior, or just love moving freely. By elevating your back foot on a bench, this stretch dives deeper into those stubborn hip flexors (like the psoas) that love to tighten up from sitting or running.
Why the Elevated Stretch Makes a Difference
While standard lunges are effective, elevating the back foot on a bench takes this stretch to an entirely new level. This position increases the angle of hip extension, which means you’re lengthening the hip flexor muscles – particularly the rectus femoris – far more than you could on the floor.
It’s like the difference between a gentle pull and a full, therapeutic release. For anyone who spends hours seated or performs repetitive hip-flexing movements like cycling, this deeper stretch is essential for restoring balance, improving mobility, and preventing the kind of chronic tightness that can lead to issues like a Trendelenburg gait or lower back pain.
Kneeling Bench Hip Flexor Lunge
Key Benefits
✔ Deeper Stretch: The bench increases the range of motion, targeting tight hip flexors more effectively than a standard lunge.
✔ Improves Posture: Releases tension that pulls your pelvis forward, helping you stand taller.
✔ Enhances Performance: Great for runners, cyclists, and lifters to maintain explosive power and stride length.
✔ Reduces Low–Back Strain: Loosening the hips takes pressure off the lower back.
✔ Mind-Body Connection: Encourages mindful breathing and body awareness, like a mini meditation for your hips.
✔ Prepares for Advanced Movements: The deep hip extension gained here is foundational for movements like the cossack squat stretch and deep lunges.
✔ Promotes Better Ankle Mobility: The position requires stability in the front ankle, which can help improve dorsiflexion over time.
✔ Can Be Scaled for Intensity: By adjusting the height of the bench or the depth of the lunge, you can easily tailor the stretch to your needs.
✔ Enhances Glute Activation: The stretch position naturally encourages the glute of the front leg to engage, reminding this often-underused muscle how to fire.
How To Do Kneeling Hip Flexor Stretch
1. Set up
✔ Place a sturdy bench (or low step) behind you. Start in a kneeling position with one foot forward in a lunge.
2. Elevate Your Back Foot
✔ Rest the top of your back foot on the bench, keeping your knee on the ground (use a mat for comfort).
3. Square Your Hips
✔ Face forward, avoiding any twisting, imagine your hips are headlights pointing straight ahead.
4. Engage Your Core
✔ Gently brace your abs to protect your lower back.
5. Lunge Forward
✔ Shift your weight forward until you feel a stretch along the front of your back-leg hip. Keep your front knee aligned over your ankle.
6. Hold & Breathe
✔ Stay for 20–30 seconds, breathing deeply. Switch sides.
Modifications and Progressions
This stretch is highly adaptable. Here’s how to tailor it to your level:
Beginner Modification (Knee Comfort): If the kneeling knee feels pressure, place a thick, folded yoga mat, a pillow, or a specialized knee pad underneath it for cushioning. You can also use a lower bench or step to reduce the angle of the stretch.
Beginner Modification (Balance): If you feel unsteady, perform the stretch next to a wall or sturdy piece of furniture that you can lightly touch for balance. This allows you to relax into the stretch without worrying about wobbling.
Advanced Variation (Deeper Stretch): To intensify the stretch, once you are in the forward lunge position, gently squeeze the glute of your front leg. This action tilts your pelvis posteriorly and deepens the stretch in the back leg’s hip flexor.
Advanced Variation (Arm Reach): As you lunge forward, raise the arm on the same side as your back leg overhead and lean slightly away. This adds a side-body stretch, engaging the obliques and QL muscle, complementing a dedicated QL stretch.
Dynamic Variation: Instead of a static hold, you can perform small, gentle pulses forward and back, moving in and out of the deepest part of the stretch by an inch or two. This dynamic approach can be a great way to warm up the area before holding the stretch statically.
Integrating the Kneeling Bench Stretch into Your Routine
This powerful stretch can be used in several key ways:
Post-Workout Cool-Down: This is its ideal use. After activities like running, cycling, or leg day, your muscles are warm and primed for lengthening. Holding this stretch for 30-45 seconds per side helps release the hip flexors and quads, aiding recovery and maintaining flexibility. It’s a perfect partner for other cool-down stretches like the lying hip flexor stretch and glute stretches.
As a Dedicated Mobility Session: Include it in a weekly mobility routine focused on the hips and lower body. Pair it with the butterfly stretch for the inner thighs and the pigeon pose for the external rotators.
During Active Recovery: On rest days, a very gentle, brief version of this stretch can improve circulation and maintain mobility without stressing the joints.
Pre-Run or Pre-Cycling (with caution): While deep static stretching is generally best after a workout, you can use the dynamic pulsing version of this stretch as part of an advanced warm-up to wake up the hips, provided you don’t push into deep, passive tension.
Core Essentials: Bench Hip Flexor Lunge
Muscles Worked | Difficulty Level |
Hip flexors (psoas, rectus femoris), quads | Intermediate to Advanced |
Safety First
⚠️Avoid if: You have knee or hip injuries (or modify with padding under your knee).
⚠️ Warm up first: Never perform this deep stretch on cold muscles. A few minutes of light cardio, like marching in place or jumping jacks, prepares the tissues for deeper lengthening and reduces injury risk.
⚠️ Use proper padding: Always place a thick mat, folded towel, or kneeling pad under your back knee. Hard surfaces can cause discomfort and prevent you from relaxing fully into the stretch.
⚠️ Listen for “good pain” vs. “bad pain”: A deep, diffuse stretch sensation is normal and productive. Sharp, pinching, or stabbing pain in the hip or knee is a signal to stop immediately and reassess your form.
⚠️ Maintain core engagement: Keep your abs gently braced throughout the hold. This protects your lower spine and ensures the stretch targets the hip flexors, not your lumbar vertebrae. This principle is key in many core workouts as well.
🚫Common Mistakes:
1️⃣ Knee past toes? 🦵🚫 Keep it aligned to protect your joints!
2️⃣ Hips lazy? 🏋️♂️🔥 Drive them forward for a deeper stretch!
3️⃣ Slouching? 🧎♂️💪 Stand tall chest up, core tight!
4️⃣ Back leg bent? 🦵🔍 Straighten it & press into the bench!
5️⃣ Glutes asleep? 🍑👊 Squeeze them to boost the stretch!
6️⃣ Forgetting to breathe? 🌬️😤 Deep breaths = better mobility!
7️⃣ Foot turned out? 🦶❌ Keep your front foot pointing straight ahead to protect the knee and ensure proper hip alignment.
8️⃣ Rushing the stretch? ⏱️ Slow, controlled holds of 20-30 seconds are far more effective than quick, bouncing movements. This principle applies to most stretching exercises for optimal gains.
9️⃣ Holding tension in your shoulders? 🙆 Relax your shoulders down away from your ears. Unnecessary upper body tension can detract from the focus on your hips.
FAQ
How often should I do the kneeling bench hip flexor stretch?
For best results, aim to do it 3-5 times per week, ideally after workouts when your muscles are warm. Holding for 20-30 seconds per side, 2-3 times, is a great goal. It’s a powerful addition to any 5-minute daily stretching routine focused on lower body recovery.
I feel a pinching sensation in my front hip, not a stretch. What's wrong?
A pinching sensation can indicate that you’re not keeping your pelvis in a neutral position. Focus on the “tuck” cue – gently squeeze the glute of your front leg. This posterior pelvic tilt helps target the stretch to the muscle belly rather than compressing the front of the hip joint. If the pinch persists, reduce the range of motion.
Can this stretch help with lower back pain?
Yes, absolutely. Tight hip flexors are a primary contributor to anterior pelvic tilt, which puts chronic strain on the lumbar spine. By deeply releasing the hip flexors, this stretch helps the pelvis return to a more neutral position, alleviating that tension. It’s a valuable tool in any program for exercises for lower back pain.
Is it safe to do this stretch if I have a knee replacement?
This stretch places significant stress on the kneeling knee and should generally be avoided after knee replacement surgery. Always follow the specific guidelines provided by your surgeon and physical therapist. Safer alternatives might include the standing hip flexor stretch or the lying hip flexor stretch.
Why is one side always tighter than the other?
Asymmetry is completely normal and often results from daily habits (like which leg you lead with on stairs or in sports) or past injuries. This information is useful! Spend a little more time breathing into the tighter side to help restore balance, which can also improve your symmetry in bilateral movements like squats and good mornings exercise.
Quick Tip:
Think of your hip flexors like rubber bands, if they’re always crunched up, they lose their snap. Add this stretch post-workout or during a work break to keep them long and happy. 🚀