Feeling that nagging pinch between your shoulder blades? You’re likely meeting your rhomboids, the key postural muscles that often become the secret vault of tension. Let’s set them free!
Introduction
The rhomboid muscles, nestled between your shoulder blades and spine, are crucial for posture and shoulder movement. These stretches specifically target that often-neglected area, helping to release the tightness that comes from hours of sitting, driving, or computer work. Think of them as unlocking a stiff, rusty hinge between your shoulders.
Key Benefits: Why Your Rhomboids Will Thank You 🎁
- Combat “Tech Neck” & Improve Posture: Counteract the forward slump, promoting an upright, confident stance.
- Relieve Pain & Discomfort: Directly alleviate that familiar ache and stiffness in the upper back and neck.
- Enhance Shoulder Mobility & Flexibility: Increase your range of motion for smoother, more fluid movements in daily life and exercise.
- Reduce Headache Tension: Release muscular knots that can contribute to tension headaches.
- Promote Mind-Body Awareness: This focused stretching encourages a moment of mindfulness and connection with your body.
Step-by-Step Guide: Your Path to a Looser Back
Safety First: Move slowly and gently. You should feel a satisfying pull, not sharp pain. Breathe deeply into each stretch.
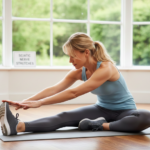
1. Seated Rhomboid Stretch (The “Hug Yourself”)
- Step 1: Sit tall on a chair with your feet flat on the floor.
- Step 2: Extend your arms straight in front of you at shoulder height.
- Step 3: Cross one arm over the other, bend your elbows, and try to bring your palms together. If they don’t touch, grasp opposite shoulders or your upper arms.
- Step 4: Gently round your upper back, dropping your chin slightly, and pull your shoulders away from each other until you feel a stretch between your shoulder blades.
- Step 5: Hold for 20-30 seconds. Switch which arm is on top and repeat.
- Modification: Can’t clasp? Simply hug yourself tightly.
2. Cross-Body Shoulder Pain-Relief Stretch 👐
- Step 1: Stand or sit up tall. Gently draw your shoulder blades down your back to avoid shrugging. This is key for a proper cross-body shoulder stretch.
- Step 2: Extend your right arm straight out in front of you at shoulder height.
- Step 3: Bring your arm across your chest to the left side. Use your left hand to gently hug your right arm just above the elbow, guiding it closer to your body.
- Step 4: Keep your right shoulder relaxed and down. You should feel a deep, releasing stretch in the back of your right shoulder and upper back.
- Step 5: Hold for 25-30 seconds. Repeat on the opposite side for balanced flexibility.
3. Doorway Chest & Rhomboid Opener
- Step 1: Stand in a doorway. Raise your arms to a “goalpost” position (elbows bent at 90 degrees, palms forward) to begin your doorway stretch.
- Step 2: Place your forearms and palms flat on the door frame.
- Step 3: Take a small, gentle step forward with one foot, letting your chest move through the doorway.
- Step 4: Keep your spine long. You should feel a glorious opening across your chest and a stretch in your upper back. This builds crucial upper-body flexibility.
- Step 5: Hold for 25-30 seconds.
4. Thread the Needle (For Advanced Flexibility) 🧵
- Step 1: Start on your hands and knees in a tabletop position, preparing for the Thread the Needle stretch.
- Step 2: Inhale, and as you exhale, slide your right arm (palm up) underneath your left arm and across the mat, lowering your right shoulder and ear to the floor.
- Step 3: Your left arm can stay extended or bend for support. Gaze toward your left side.
- Step 4: Feel the deep stretch across your right shoulder blade. This is a prime move for rotational flexibility.
- Step 5: Hold for 20-25 seconds, then slowly return. Repeat on the other side.
Safety Tricks & Common Mistakes ⚠️
Safety Tricks:
- Warm Up First: Never stretch cold muscles. Do 5 minutes of light cardio (arm circles, jumping jacks) first.
- Breathe Deeply: Inhale to prepare, exhale as you deepen the stretch. This is your body’s natural relaxation tool.
- Listen to Your Body: Distinguish between “good tight” and “bad pain.” The latter means STOP.
- Be Consistent: Short, daily stretching is far better than one long, aggressive weekly session.
Common Mistakes to Avoid:
- Rushing: Jerking or bouncing into the stretch (ballistic stretching) can cause injury.
- Shrugging Shoulders: Keep your shoulders actively pulling down away from your ears during stretches.
- Holding Your Breath: This creates tension, counteracting the stretch’s goal.
- Overarching the Lower Back: In stretches like the doorway, engage your core to keep your ribs down and protect your spine.
FAQ’s: Your Rhomboid Questions, Answered! 💬
Q: How often should I do these stretches?
A: For best results and improved long-term flexibility, aim for a short routine 4-5 times per week, especially after activities that tighten the area.
Q: I feel a sharp pain, not a stretch. What’s wrong?
A: Sharp pain is a red flag. You may be going too far, have an underlying injury (like a strain), or have incorrect form. Ease off and consult a physical therapist or doctor if it persists.
Q: Can tight rhomboids cause neck pain?
A: Absolutely! The muscular network of the upper back, shoulders, and neck is interconnected. Tight rhomboids pull on surrounding tissues, often manifesting as neck stiffness or headaches.
Q: What’s the difference between rhomboid major and minor?
A: Think of them as neighbors in a two-story building. The rhomboid minor is the smaller, upper apartment, attaching higher on the spine. The major is the larger, lower apartment underneath. Most stretches effectively target both.
Pro Tip
Try this pre-stretch activation trick: Before you begin any stretch, gently squeeze your shoulder blades together (as if trying to hold a pencil between them) for 5 seconds, then release. This “wakes up” the rhomboids and helps create a more effective, mindful stretch by engaging the very muscles you’re about to release.