🧠 What is a Trendelenburg Gait?
A Trendelenburg gait is a distinctive walking pattern often described as a “hip drop” or “waddling” walk. It occurs when the hip abductor muscles on the side of your stance leg are too weak to keep your pelvis level. Imagine a seesaw that dips to one side with every step; that’s your pelvis during this gait pattern. It’s not just a walk; it’s a sign that your hip stability needs attention. This page is your guide to regaining control. We’ll focus on stretches and strengthening exercises that target the root causes, promoting flexibility, stability, and pain-free movement.
💪 Key Benefits of Targeted Trendelenburg Exercises
- Enhanced Hip Stability & Strength: This program directly targets and strengthens the gluteus medius and minimus, the key muscles responsible for stabilizing your pelvis with every step you take. A stable and strong hip foundation is essential for a smoother, safer walk.
- Reduced Pain & Injury Risk: By systematically correcting the underlying muscle imbalances, you alleviate abnormal stress on your hips, knees, and lower back. This proactive approach builds greater flexibility and resilience in your joints, preventing future issues.
- Improved Posture & Balance: Training your body to maintain a level pelvis transforms your alignment. You will stand taller and move with increased confidence, transitioning from an inefficient waddle to a strong, graceful stride.
- Optimized Walking Efficiency: A stable and mechanically sound gait is an energy-efficient one. You will expend less effort with each step, allowing you to walk farther with less fatigue. This unlocks a new level of flexibility and ease in all your daily movements.
- Boosted Movement Confidence: Beyond the physical gains, there is a profound mental benefit to moving without pain or compensatory patterns. Reclaiming control over your walk fosters a powerful sense of empowerment and body confidence.
🧘 Your Step-by-Step Exercise & Stretch Routine
Safety First! 🛑 Consult a doctor or physical therapist before starting any new exercise program, especially if you have pain or a diagnosed condition.
1. The Glute Bridge (Foundational Activation)
- How To: Lie on your back with knees bent, feet flat on the floor, hip-width apart. Squeeze your glutes and lift your hips toward the ceiling until your body forms a straight line from shoulders to knees. Hold for 3 seconds, then lower with control.
- Beginner Mod: Perform without holding. Just focus on the up-and-down motion.
- Pro Tip: At the top, try lifting one foot off the ground for a single-leg bridge to really challenge your stability.
2. Clamshells (Targeting the Gluteus Medius)
- How To: Lie on your side with legs stacked and knees bent at a 90-degree angle (like a clamshell). Keep your feet touching and slowly open your top knee as high as you can without rocking your pelvis backward. Think of prying open a stubborn clam shell using only your hip muscle.
- Common Mistake: Don’t let your top hip roll backward. Move slowly and with control.
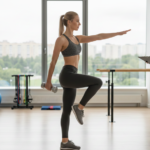
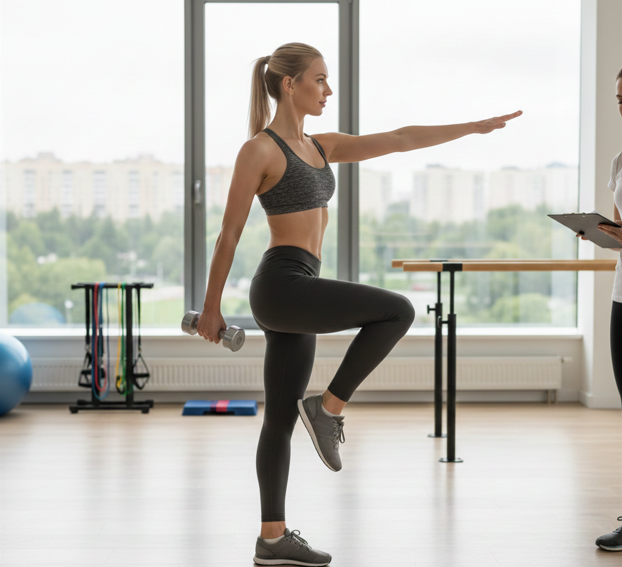
3. Standing Hip Abduction (Functional Strength)
- How To: Stand tall, holding onto a chair or wall for balance. Keeping your leg straight and toes pointing forward, slowly lift your leg out to the side. Focus on using the muscle on the side of your hip (the abductors), not your lower back. Lower it back down with control.
- For More Flexibility: Add a slow, controlled pulse at the top of the movement.
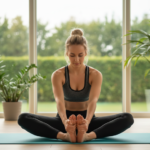
- Complementary Stretch: After strengthening your hip abductors, it’s beneficial to stretch the opposing muscle group. Perform a gentle hip adductor stretch (such as a seated butterfly stretch or a lateral lunge) to maintain muscular balance and overall hip flexibility.
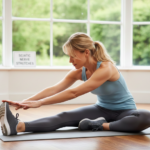
4. Figure-4 Piriformis Stretch (For Critical Flexibility)
- How To: Sit or lie on your back. Cross one ankle over the opposite knee, creating a “figure-4” shape. Gently press down on the raised knee until you feel a deep stretch in your buttocks/hips. Hold for 30 seconds. This stretch promotes crucial flexibility in the deep hip rotators, which often get tight.
5. Monster Walks with a Resistance Band (Gait Integration)
- How To: Place a resistance band around your ankles. Slightly bend your knees into a mini-squat position. Take small, controlled steps sideways, maintaining tension on the band. This directly teaches your glutes to fire during lateral movement, which is key for gait stability.
⚠️ Safety Tricks & Common Mistakes to Avoid
🔒 Safety Tricks
- Prioritize Form Over Force: It’s better to do 5 perfect reps than 20 sloppy ones. Quality movement retrains your nervous system.
- Start Without Weight: Master the bodyweight movement pattern before adding bands or ankle weights.
- Listen to “Good Pain” vs. “Bad Pain”: A muscle burn or stretch is fine. Sharp, shooting, or joint pain is a stop signal.
- Breathe!: Exhale during the exertion phase (e.g., lifting your leg), inhale as you release. This oxygenates muscles and keeps you focused.
❌ Common Mistakes
- Letting the Pelvis Tilt or Rock: This is the #1 error. In side-lying or standing exercises, keep your torso stable and still. Place a hand on your hipbone to feel for unwanted movement.
- Using Momentum: Don’t swing your leg! Slow, controlled movements are far more effective for building strength.
- Neglecting the Core: Your core and glutes work as a team. Gently brace your abdomen (like you’re about to be tickled) to support your lower back.
- Skipping the Stretch: Tight muscles are weak muscles. Always include stretches like the Figure-4 to maintain balance and flexibility.
❓ FAQ’s
Q: Can I fix a Trendelenburg gait on my own with these exercises?
A: For a noticeable, long-term correction, these exercises are essential. However, because the causes can vary (nerve issue, arthritis, post-surgery), working with a physical therapist is highly recommended. They can provide a personalized plan and ensure your form is perfect.
Q: How long will it take to see improvement in my walking pattern?
A: Consistency is key! With daily practice, you may feel muscles activating better within 2-3 weeks. Visible changes in your gait pattern often take 4-8 weeks of dedicated work. Think of it as retraining a habit you’ve had for months or years.
Q: Are these exercises also good for general hip health?
A: Absolutely! These are fantastic preventative exercises for anyone who sits a lot, runs, or wants to avoid common hip and knee pains. Strong hip abductors are the unsung heroes of a healthy, mobile body.
Q: I feel the burn in my thigh/back, not my hip. What am I doing wrong?
A: This usually means other muscles are compensating. Reduce your range of motion, slow down, and really focus on mentally “waking up” the muscle on the side of your hip. A light touch with your finger on the correct spot can help your brain connect better.
💡 PRO TIP
Don’t just strengthen the weak side that drops; train the opposite stance leg that fails to stabilize. When your right hip drops, it’s actually your left gluteus medius that’s not holding strong. Focus on building endurance in that stance-side hip abductor with slow, controlled holds. This mimics the real-world demand of keeping your pelvis level while walking. Think of it as training the anchor that prevents the ship from listing, not just repairing the leaning mast. 🔄