Abs & Core
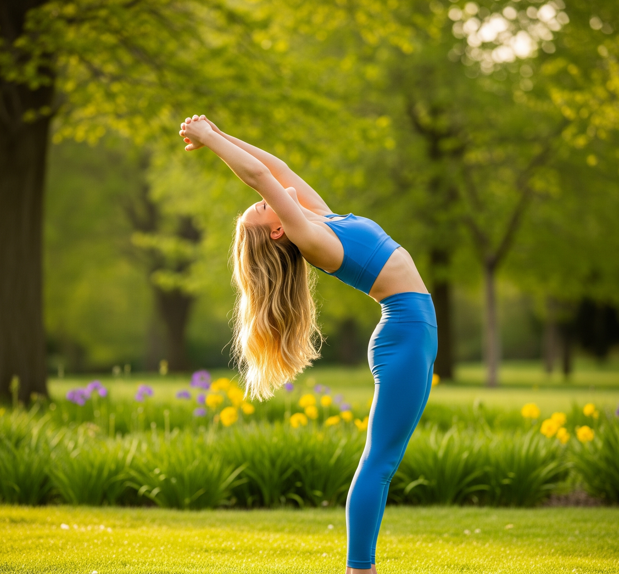
Standing Back Bend
Unlock Spine Flexibility With This Pose
The Standing Back Bend is your secret weapon against modern-day hunching! This rejuvenating stretch targets your entire front body from tight chest muscles to stiff hip flexors while improving spinal flexibility and posture. Think of it as hitting the “reset button” on your spine after hours of sitting. Whether you’re an athlete needing mobility or an office worker battling stiffness, this stretch helps counteract that forward-slumping posture we all fall into.
Key Benefits 💪
✅ Improves Spinal Flexibility – Say goodbye to that “stuck” feeling in your back
✅ Opens Tight Chest & Shoulders – Perfect antidote to computer hunch
✅ Stretches Hip Flexors – Relieves tension from prolonged sitting
✅ Boosts Energy & Mood – The gentle backbend stimulates your nervous system
✅ Enhances Posture – Teaches your spine to move in all directions
Standing Back Bend Stretch
📝How To Do Standing Back Bend
1️⃣ Start Standing Tall
- Feet hip-width apart, knees slightly bent (no locking!)
- Hands on lower back with fingers pointing down (like you’re sliding them into back pockets)
2️⃣ Engage Your Core
- Gently draw belly button toward spine (imagine zipping up tight jeans)
- Keep your neck long (don’t let head drop back yet)
3️⃣ Begin the Bend
- Lean back from upper back, not just your neck
- Imagine you’re bending over a giant exercise ball behind you.
4️⃣ Find Your Range
- Only go as far as you can while breathing comfortably
- Hold for 15-30 seconds, breathing deeply
5️⃣ Return Slowly
- Roll up vertebra by vertebra like a slow-motion wave
🔥 Modifications:
- Beginner: Try against a wall for support
- Advanced: Reach arms overhead and interlace fingers
📊 Quick Reference Table
Muscles Worked | Difficulty Level |
Spinal extensors, Chest, Hip flexors, Shoulders | Intermediate |
⚠️Safety Tricks
🔹 Warm Up First – Do some gentle side bends and twists before attempting.
🔹 Move Like Honey – Slow, controlled movements prevent strain.
🔹 Listen to Your Spine – Mild discomfort is okay; sharp pain means stop.
❌ Common Mistakes:
🔸 Dumping into Lower Back – Keep core engaged to protect spine
🔸 Overarching the Neck – Keep gaze forward until you’re more flexible
🔸 Holding Your Breath – Deep breathing helps deepen the stretch safely
Related Standing Back Bend Stretches
If you want to vary the pose or find a version that suits your body better, try these:
Supported Standing Backbend
The Setup: Stand with your back to a solid wall, about half a foot to a foot away. Place your palms flat on the wall behind you at hip height, fingers pointing downward.
The Movement: Inhale, lift your chest, and begin to walk your hands slowly down the wall, sliding them toward the floor. Let your hips shift slightly forward away from the wall as your spine arches. Go only until you feel a good stretch in your chest and shoulders.
Why do it: This is the safest version for beginners. The wall supports your weight, so your back muscles don’t have to work as hard to hold you up. It allows you to focus purely on opening the chest without fear of losing balance or compressing the spine.
Hands-to-Heels Backbend
The Setup: Begin in the standard Standing Back Bend (hands on lower back).
The Movement: Once you are arched back comfortably, if your flexibility allows, begin to slide one hand down toward the back of your same-side thigh. Reach for your heel or calf. If stable, repeat with the other hand. Your neck can relax and drop back. Think of pushing your hips forward slightly to deepen the arch.
Why do it: This is an intensifier. By grabbing the heels, you create a closed loop of energy that allows you to pull your chest further open. It also tests your balance and hamstring flexibility. Note: Only do this if you feel stable and pain-free in the basic version.
Upward Salute (Urdhva Hastasana)
The Setup: Stand in Mountain Pose.
The Movement: Inhale deeply and sweep your arms out to the sides and up overhead, bringing your palms to touch (or keeping them shoulder-width apart). As your arms rise, gently arch your upper spine backward, looking up at your thumbs. Keep your lower body stable; the movement is primarily in the upper back.
Why do it: This is a perfect warm-up for the deeper backbend. It teaches you to lift the ribs and open the chest without the intensity (or potential lower back compression) of a full backbend. It’s also a great midday stretch to do at your desk.
Cobra Pose (Bhujangasana)
The Setup: Lie face down on the floor (or mat). Place your hands flat on the floor under your shoulders, elbows hugged in close to your body. Point your toes straight back (tops of the feet on the floor).
The Movement: On an inhale, begin to straighten your arms to lift your chest off the floor. Press the tops of the feet and thighs firmly into the floor. Go only as high as you can while keeping your pubic bone pressed to the floor. For a gentle backbend (Low Cobra), keep your elbows bent. For a deeper stretch (High Cobra), straighten the arms more, but keep your shoulders away from your ears.
Why do it: While the Standing Back Bend uses gravity and leg strength, the Cobra Pose uses arm leverage and back strength to achieve a similar spinal extension. It is the perfect “counterpart” pose to do later in a workout. It also specifically targets the thoracic spine (upper back) and strengthens the spinal erectors, which helps improve your standing backbend over time.
Incorporating it into a Daily Schedule
The “best” time depends on your goal. Below are the two optimal windows, expanded with specific context on why the body responds well at these times, and a short routine to follow.
1. Morning (The Energizer)
Why it works: Overnight, your spine compresses slightly as the intervertebral discs rehydrate. More importantly, you’ve likely been sleeping in a “flexed” position (curled up on your side or stomach). The Standing Back Bend is the ultimate anti-sleep pose. It extends the spine, expands the rib cage (which was compressed while sleeping), and stimulates the sympathetic nervous system, effectively telling your body: “Wake up, it’s time to be alert.”
The Risk: In the morning, your body is “cold.” The synovial fluid in your joints is thick, and your muscles are tight.
The Morning Micro-Routine (2 Minutes):
Neck Rolls (30 seconds): Stand tall, let your head drop to the right, roll forward, and to the left. Loosen the neck.
Shoulder Rolls (30 seconds): Roll shoulders backward 5 times, then forward 5 times. Open the shoulder joints.
Half-Backbend Warmup (30 seconds): Clasp your hands behind your back (fingers interlaced). Straighten your arms and gently pull your hands toward the floor while lifting your chest to the ceiling. This opens the shoulders before the spine bends.
Standing Back Bend (30 seconds): Perform the pose as described, keeping the bend moderate. Focus on the breath.
2. Midday or After Work (The Desk Antidote)
Why it works: When you sit at a desk, you put your body into a position called “thoracic kyphosis” (hunchback). The front of your body shortens (hip flexors, chest, abdominals), and the back of your body overstretches and weakens. The Standing Back Bend is a direct counter-mechanism. It re-lengthens the front body and reminds the spine of its full range of motion.
The “Tech Neck” Connection: Looking down at a screen creates “anterior head carriage.” This pose helps bring the head back over the shoulders.
The Midday Micro-Routine (2 Minutes at your desk):
Seated Chest Opener (30 seconds): While still sitting, grab your right wrist behind your back. Pull your shoulders down and lift your chest. Switch sides.
Chair Backbend (30 seconds): Still seated, scoot to the edge of your chair. Reach back and hold the backrest or the top of the chair. Push your chest forward and up.
Standing Back Bend (1 minute): Stand up, walk away from your desk, and perform the Standing Back Bend. Because you’ve been sitting for hours, your body is actually “warmer” than in the morning, so you might find a slightly deeper stretch here. Focus on pushing the hips slightly forward to stretch the hip flexors.
Bonus: Evening (The Relaxer) Proceed with Caution
While generally not recommended right before bed due to its invigorating nature, a very gentle version can be done to release the day’s tension.
Why (sometimes): If you carry stress in your chest or shoulders, a passive backbend can release emotional tension.
How to do it differently: If you do it at night, do not hold it for long. Focus on exhaling deeply to relax into the stretch, rather than inhaling to expand the chest (which is stimulating). Follow it immediately with a forward fold (Uttanasana) to calm the nervous system back down.
FAQ's
Q: Is this pose safe for beginners?
A: Yes, but start gently. Keep your hands on your hips or lower back for support and only go as far as comfortable.
Q: Can I do this if I have back pain?
A: It depends. It helps with poor posture, but avoid it if you have a serious injury (like a herniated disc). When in doubt, ask a doctor.
Q: Why does my lower back hurt when I bend?
A: You’re bending from the wrong spot if you feel it in your lower back. Squeeze your glutes and tuck your tailbone slightly to force the arch higher into your upper back. This protects your lumbar spine and shifts the stretch to your chest and hip flexors. For a deeper release, follow up with a glute stretch like seated figure-four or pigeon pose to balance the hips. Strong glutes and open hips are the secret to a pain-free backbend.
Q: How long should I hold the stretch?
A: Hold for 20 to 30 seconds. Breathe deeply the whole time.
Q: Should I strengthen my abs to protect my back?
Before you arch back, engage your abs like you’re holding a plank for abs. This simple action protects your lower spine from compression. Think belly button slightly in, chest lifting up. Strong abs (built through Plank) allow your backbend to come from the upper back safely. No core engagement = no safe backbend.
Quick Tip:
The power of a safe backbend comes from your legs, not your spine. Firmly press your thighs backward and squeeze your glutes slightly as you arch. This creates a stable foundation and prevents you from collapsing into your lower back. Imagine your legs are rooted like tree trunks while your upper body opens like a flower. Strong legs equal a happy lower back.