🧘 Introduction: What Is the Dead Bug Exercise?
Imagine lying on your back, arms reaching toward the ceiling, legs bent at 90 degrees, and moving opposite limbs in a slow, controlled rhythm just like an upside-down bug wiggling its legs! That’s the dead bug exercise, one of the most effective and safest core workout moves you’ll ever learn. 🐞 But here’s the secret: this isn’t just another ab exercise. It’s a full core workout that strengthens your entire midsection while protecting your spine, making it a perfect addition to your daily core stretch routine.
So, what exactly does this stretch target? 🎯 The core dead bug exercise primarily focuses on your transversus abdominis (your deepest core muscle), rectus abdominis (six-pack muscles), obliques, and hip flexors. But here’s the magic it also teaches your body core stability by forcing your lower back to stay pressed against the floor, which builds strength without straining your spine. Unlike crunches that compress your vertebrae, the dead bug core exercise promotes flexibility in your hips and shoulders while enhancing spinal flexibility through controlled movement. Plus, because your shoulder blades stay grounded, this move releases tension in your upper back, improving posture and reducing the dreaded “tech neck” from hours at a desk.
Think of it as a “conversation between your arms and legs” 🗣️; each movement requires your core to play peacekeeper, keeping your pelvis stable while your limbs do their thing. Whether you’re an athlete looking for better performance, someone with lower back pain seeking relief, or just starting your fitness journey, the dead bug exercise can be scaled to your level. It’s a foundational move that builds a strong, resilient midsection while improving coordination and mind-body connection. 🌟 And if you’re short on time or prefer to stay on your feet, this move can even be adapted into a standing core workout with slight modifications keeping your core engaged while you stand tall!
With consistent practice, this core exercise dead bug routine becomes the cornerstone of your fitness regimen, improving not just physical strength but also your posture and everyday movement confidence. Pair it with other core stretches like planks or bird dogs for a complete routine, or use it as a warm-up before your main core workout. Your upper back and spine will thank you for the relief! Ready to get down on the floor and bug out? Let’s dive into the benefits! 💪
🌟 Key Benefits of the Dead Bug Exercise
Here’s why adding dead bug exercises to your routine is a total game-changer:
-
🛡️ Protects Your Lower Back – By teaching you to keep your spine neutral and pelvis stable, this exercise reduces lower back pain and prevents injury during daily activities or heavier lifts.
-
🔥 Builds Deep Core Strength – The dead bug core exercise targets the transversus abdominis your body’s natural weightlifting belt, giving you a rock-solid foundation for all other movements.
-
🧠 Enhances Coordination & Body Awareness – Moving opposite limbs requires concentration, improving neuromuscular coordination. It’s like patting your head and rubbing your belly, but way more beneficial! 🤹
-
📈 Improves Posture & Balance – A strong core keeps your spine aligned, reducing slouching. Better balance means fewer falls and more confidence in sports or everyday tasks.
-
♿ Accessible for All Fitness Levels – Whether you’re a beginner or advanced athlete, the what is dead bug exercise answer is simple: it’s scalable. Add weights, slow down tempo, or increase reps to match your goals.
📋 Step-by-Step Instructions: How to Do the Dead Bug Exercise
Follow these simple steps to master the dead bug exercise with proper form:
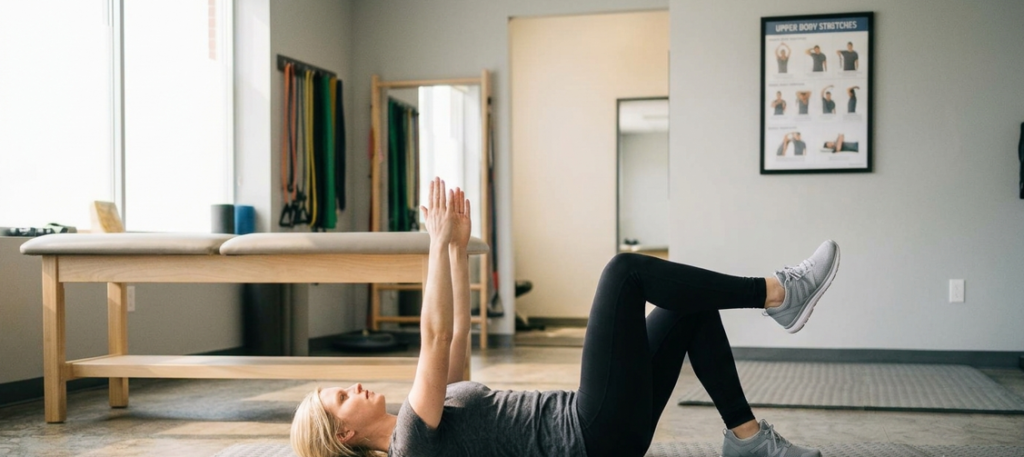
🪲 Setup
-
Lie on Your Back – Lay flat on a mat with your knees bent, feet flat on the floor, and arms extended toward the ceiling (palms facing each other).
-
Engage Your Core – Gently press your lower back into the mat. Imagine you’re trying to slide a thin piece of paper under your back that’s the amount of space you want to maintain! 📄
-
Lift Your Legs – Raise your thighs until your knees are directly above your hips, forming a 90-degree angle. Your shins should be parallel to the floor.
🦵 The Movement
-
Extend Opposite Limbs – Slowly straighten your right leg toward the floor (hovering above the mat) while simultaneously reaching your left arm overhead (hovering above the floor).
-
Return to Start – Bring both limbs back to the starting position in a slow, controlled motion.
-
Switch Sides – Repeat on the opposite side: left leg extends with right arm.
-
Continue Alternating – Perform 8–12 reps per side for 2–3 sets.
🔄 Modifications
-
👶 For Beginners: Keep your heels on the floor (bent knees) and only extend your arms first. Once comfortable, add leg extensions. Alternatively, slide your heels on the floor instead of lifting them.
-
🧗 For Advanced Users: Hold a light dumbbell or ankle weight. Slow the tempo down to 5 seconds per extension. Or try the dead bugs exercise with a resistance band around your feet for added challenge.
-
🧘 For Flexibility Focus: Pair this with cat-cow or pelvic tilts before starting to enhance spinal flexibility.
📊 Quick Reference Table
| Muscle Groups Worked | Difficulty Level |
|---|---|
| Transversus Abdominis (deep core) | ⭐⭐ Easy to Moderate |
| Rectus Abdominis (six-pack) | ⭐⭐ Easy to Moderate |
| Internal & External Obliques | ⭐⭐ Moderate |
| Hip Flexors (Iliopsoas) | ⭐ Easy |
| Quadriceps (during leg extensions) | ⭐ Easy |
| Shoulder Stabilizers (during arm reach) | ⭐ Easy |
⚠️ Safety Tricks & Common Mistakes
🛡️ Safety Tricks (Do’s)
-
✅ Press Your Lower Back Down – Keep your spine glued to the mat throughout the movement. If your back arches, reduce your range of motion.
-
✅ Breathe Rhythmically – Exhale as you extend your limbs, inhale as you return. This engages your deep core more effectively. 🌬️
-
✅ Move Slowly – Control is key! Count to 3 on the way out and 3 on the way back to maximize time under tension.
-
✅ Start Small – Only extend limbs as far as you can without losing that lower-back connection to the floor.
🚫 Common Mistakes (Don’ts)
-
❌ Arching Your Lower Back – This shifts pressure to your spine. If you feel your back lifting, reduce the range of extension immediately.
-
❌ Rushing the Movement – Speed kills control. The dead bug exercise is about quality, not quantity. Slow down! 🐢
-
❌ Holding Your Breath – Starving your muscles of oxygen reduces performance and can spike blood pressure. Breathe continuously.
-
❌ Extending Too Far – If your limbs touch the floor, you’re going too far. Keep them hovering to maintain constant core tension.
❓ FAQ’s About Dead Bug Exercise
Q1: What is dead bug exercise good for?
The dead bug exercise is excellent for building core stability, improving coordination, reducing lower back pain, and enhancing posture. It targets deep core muscles without stressing your spine.
Q2: Is the dead bug exercise safe for lower back pain?
Yes! In fact, physical therapists often prescribe the dead bug core exercise for back pain relief. Just ensure you keep your lower back pressed firmly against the mat and start with beginner modifications.
Q3: How many reps of dead bug exercise should I do?
Aim for 8–12 reps per side for 2–3 sets. Focus on form first, then gradually increase reps or add weights for progression.
Q4: Can I do dead bug exercise every day?
Absolutely! It’s a low-impact, joint-friendly movement. Daily practice improves core endurance and flexibility in your hips and spine.
Q5: What’s the difference between dead bug and bird dog?
While both involve opposite limb extensions, the dead bug exercise is performed lying on your back (targeting anterior core), whereas bird dog is done on all fours (targeting the posterior chain). Together, they create a balanced core routine!
Q6: Do I need equipment for the dead bugs exercise?
No! The benefits of the dead bug exercise are accessible with just your body weight. However, advanced users can add dumbbells, ankle weights, or resistance bands.
💡 Quick Tip
Think of your core as a soda can; it’s strongest when fully sealed and pressurized! 🥫 To get the most out of your dead bug core exercise, imagine someone is about to punch your stomach. Brace your core as if preparing for impact, but keep breathing naturally. This mental cue ensures your deep core muscles are fully engaged throughout every rep.
For extra spinal flexibility, perform a gentle cat-cow stretch or pelvic tilt immediately before starting your dead bug routine. This warms up your back and enhances your range of motion. 🧘