📖 Introduction
Do you spend hours hunched over a phone or laptop? The wall slides exercise is your antidote. This deceptively simple movement targets the often-neglected muscles of your upper back and shoulders, helping to reverse the dreaded “tech neck” and rounded shoulders to dramatically improve your upper body flexibility. Think of it as a reset button for your posture, teaching your shoulders how to move correctly again.
But wall slides are just one piece of the posture puzzle. To truly transform your upper body health, you need a complete wall-based mobility toolkit. That’s where complementary exercises like wall stretch relief, wall bicep stretch, wall angel stretch, chest stretch against wall, and wall pushups come into play. Together, these exercises create a comprehensive routine that targets every muscle group responsible for poor posture, from your tight chest and biceps to your weak upper back and shoulders.
Imagine your body as a finely tuned orchestra. Your chest muscles (pectorals) are like overzealous violinists, playing too loudly and pulling your shoulders forward. Your upper back muscles (rhomboids and trapezius) are the timid cellists, playing too softly to balance the sound. Wall slides help strengthen those cellists, while chest stretches quiet the violinists. Wall pushups add dynamic strength, and wall bicep stretches release tension in muscles that often go overlooked. When all these exercises work together in harmony, you achieve the perfect symphony of posture, mobility, and pain-free movement.
🔑 Key Benefits of Exercise Wall Slides
Incorporating exercise wall slides into your routine offers a powerful range of benefits for both body and mind:
-
👑 Improved Posture: By strengthening the rhomboids, lower trapezius, and serratus anterior, wall slides pull your shoulders back, counteracting forward head posture and making you look taller and more confident .
-
🏋️♂️ Enhanced Shoulder Health & Mobility: This exercise promotes proper movement in the shoulder joint (glenohumeral joint) and scapula. It’s a fantastic way to increase your shoulder flexibility and build resilience against common injuries like impingement .
-
🧠 Better Scapular Control: Think of your shoulder blades (scapulae) as the foundation for your arms. Wall slides train these stabilizer muscles to work correctly, ensuring your shoulders are stable and powerful for any other activity, from lifting groceries to playing sports .
-
💆♂️ Reduced Neck & Upper Back Tension: By correcting poor alignment and activating the postural muscles, this exercise helps alleviate chronic pain and tightness in the neck and upper back, a common complaint for desk workers .
-
🧘 Accessible & Convenient: All you need is a wall! This makes it a perfect exercise to do at home, in the office, or anywhere you can find a flat surface to improve your flexibility .
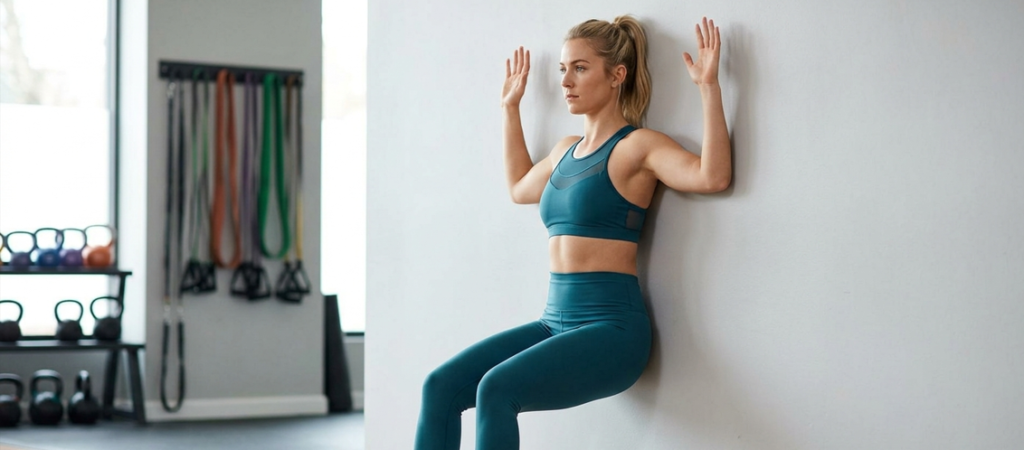
📝 Step-by-Step Instructions:
Follow these steps to perform the wall slide with perfect form.
🎯 Setup:
-
Stand with your back flat against a smooth wall. Your head, shoulders, and glutes should be in contact with the wall .
-
Place your feet about 6-12 inches away from the wall, hip-width apart. Maintain a slight bend in your knees to protect your lower back .
-
Engage your core gently by pulling your belly button toward your spine. This will keep your lower back from arching excessively .
🏃♂️ Execution:
-
Raise your arms to shoulder height, bending your elbows to 90 degrees so your fingertips point toward the ceiling. This is your starting “goalpost” position .
-
Press the backs of your hands, wrists, and elbows firmly into the wall .
-
Inhale. Slowly slide your hands up the wall, straightening your arms overhead. The key is to maintain contact with the wall throughout the entire movement .
-
Slide up as far as you can without your lower back arching off the wall or your shoulders shrugging up toward your ears. Stop when you lose contact with the wall.
-
Pause briefly at the top, focusing on feeling the muscles between your shoulder blades working.
-
Exhale and slowly slide your arms back down to the starting position, maintaining control and wall contact .
-
Aim for 2-3 sets of 8-12 repetitions.
🔧 Modifications:
👶 Beginner:
-
If you have limited mobility, slide your arms up only to shoulder height, or even less. It’s more important to maintain form than to go all the way .
-
Perform the exercise lying on your back on the floor to reduce the postural demands .
👨🎓 Advanced:
-
Place a light resistance band around your wrists. The band will add tension as you slide your arms up, increasing the challenge for your rotator cuff muscles .
-
Add a 3-5 second pause at the top of the movement before sliding back down .
📊 Quick Reference Table
| Muscle Groups Worked | Difficulty Level |
|---|---|
| Primary: Mid & Lower Trapezius, Rhomboids, Serratus Anterior | Beginner to Intermediate |
| Secondary: Deltoids (Shoulders), Rotator Cuff Muscles |
❗ Safety Tricks & Common Mistakes to Avoid
🛡️ Safety Tricks:
-
“Zip Up” Your Core: Before you even move your arms, brace your core as if someone is about to punch you in the stomach. This stabilizes your spine and prevents lower back pain .
-
Think “Proud Chest”: Gently pull your shoulder blades down and back as if you’re tucking them into your back pockets. This sets the right posture from the start .
-
Quality Over Quantity: It’s better to do 5 perfect reps than 15 sloppy ones. Stop your set the moment your form starts to break down .
-
Slow and Steady: Focus on a slow, controlled tempo. Don’t rush the slide. A 2-3 second count for the upward and downward phase is a great target .
🚫 Common Mistakes:
-
Arching Your Lower Back: Allowing your ribs to flare and your back to arch off the wall is the #1 mistake . Fix this by keeping your core tight.
-
Losing Contact with the Wall: If your elbows or wrists lift off the wall, you’re going too high. Drop your range of motion and focus on keeping everything plastered to the wall .
-
Shrugging Your Shoulders: Don’t let your shoulders creep up toward your ears. This defeats the purpose of the exercise. Keep your shoulders “packed” down .
-
Rushing the Reps: Moving too fast relies on momentum, not muscle control, and minimizes the benefits for your shoulder health .
❓ Frequently Asked Questions (FAQs)
Q1: What muscles do wall slides work?
A: Wall slides are excellent for improving upper body strength and mobility. They primarily target the mid and lower trapezius, rhomboids, and serratus anterior key muscles for posture. They also secondarily engage the deltoids and rotator cuff muscles to promote shoulder stability and health .
Q2: Can beginners do the wall slide exercise?
A: Yes, absolutely! The wall slide is highly scalable and is often used in physical therapy . Beginners can reduce the range of motion to only go as high as their shoulders allow, or perform the exercise on the floor to make it easier . The focus should always be on perfect form.
Q3: How many wall slides should I do for better posture?
A: For strengthening posture, aim for 2-3 sets of 8-10 slow, controlled repetitions. Use this exercise as part of your warm-up or as a daily “posture break,” especially if you sit at a desk for long periods . Remember, consistency is key!
Q4: Is the wall slides exercise good for shoulder pain?
A: Yes, when done correctly, exercise wall slides can be very beneficial for reducing shoulder impingement risk and improving overall shoulder mechanics . However, if you have a pre-existing shoulder injury, always consult with a doctor or physical therapist before starting any new exercise to ensure it’s safe for you.
💡 Quick Tip
Make it a daily habit! This exercise is a fantastic “movement snack.” Every time you finish a work call or get up from your desk, take two minutes to do a set of wall slides. It’s a powerful way to counter the effects of sitting and build lasting flexibility and better posture. 🧘♀️