Introduction
If your hips feel like they’ve been locked in a vice after a long day at a desk, Lizard Pose is about to become your new best friend. This deep, grounding yoga posture, known in Sanskrit as Utthan Pristhasana gets its name from the way you slither low to the ground, mimicking a lizard basking in the sun. It primarily targets the hip flexors, groin, hamstrings, and quadriceps, making it a powerhouse for anyone looking to unlock tension in the lower body. Think of it as a reset button for your flexibility, especially if you spend hours sitting.
Key Benefits 🧘♀️
-
Deep Hip Opening: Lizard Pose stretches the hip flexors and inner groin, areas that often become tight from prolonged sitting. Improved flexibility here can translate to better squat depth and easier movement in daily life.
-
Lower Back Relief: Tight hips often pull on the lower back. By releasing tension in the hip flexors and quadriceps, Lizard Pose may help alleviate nagging low back discomfort.
-
Strength Meets Stretch: Unlike passive stretches, this pose requires engagement. You’ll strengthen your core, shoulders, and inner thighs while lengthening the opposing muscles, building stability alongside flexibility.
-
Mental Calm & Focus: The forward-fold nature of the pose encourages a calming, introspective quality. It’s a chance to slow your breath and tune inward, making it a moving meditation for stress relief.
-
Athletic Recovery: Runners and cyclists love this pose for good reason it directly targets the overworked hip flexors and quads, helping you recover faster and move more freely.
Step-by-Step Instructions 📝
Follow these detailed steps to safely and effectively practice Lizard Pose. Each phase builds on the last, so take your time and listen to your body.
Phase 1: Set Up Your Foundation 🧱
-
Begin in Downward-Facing Dog (Adho Mukha Svanasana). From a standing forward fold, walk your hands out to plank, then press your hips up and back. Your body should form an inverted “V” shape. Spread your fingers wide, press through your palms, and relax your neck. Take one deep breath here to settle in.
-
Lift Your Right Leg. On an inhale, shift your weight into your left hand and lift your right leg high into the air, coming into a Three-Legged Dog (Eka Pada Adho Mukha Svanasana). Keep your right hip squared toward the mat—avoid letting it roll open. Reach actively through your right heel.
-
Step Your Right Foot Forward. On an exhale, sweep your right leg forward and plant your right foot on the outside edge of your right hand. Your foot should land like a wide, stable base think of your foot as the foundation of a house. If your foot doesn’t quite reach, shorten your stance by bringing your back leg closer.
Phase 2: Build the Pose 🏗️
-
Lower Your Back Knee (Optional but Recommended). Gently lower your left knee to the mat behind you. This creates stability and allows you to relax into the stretch rather than balancing. Place a folded blanket under your knee for extra padding—your kneecap will thank you later!
-
Check Your Front Knee Alignment. Look down at your right knee. It should track directly over your right ankle, not past your toes, and not collapsing inward. If it’s drifting inward, widen your stance by sliding your right foot slightly to the right. If it’s past your toes, step your foot further forward.
-
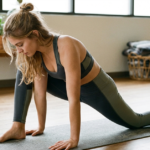
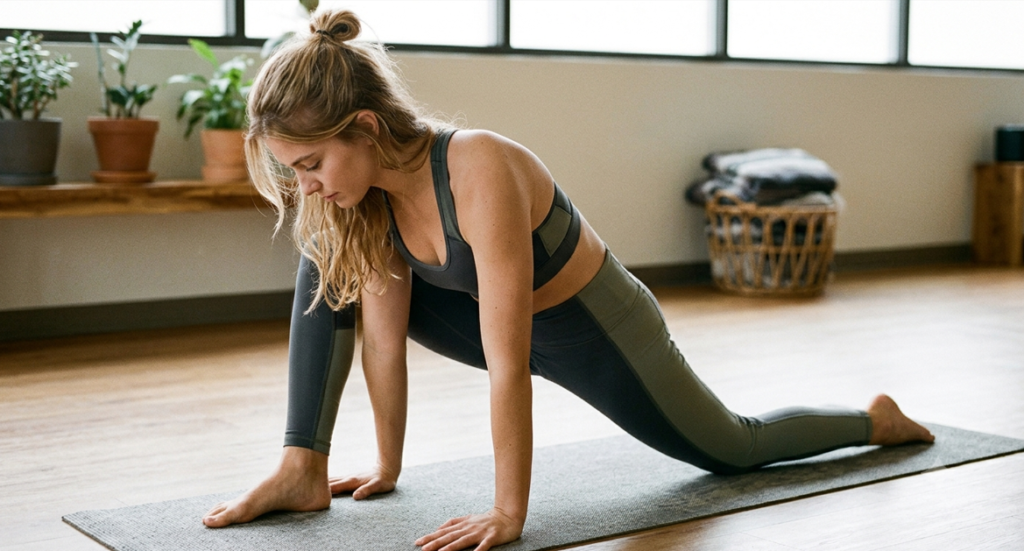
Walk Your Hands Forward. Slowly walk your hands forward along the mat, moving them toward the inside of your right foot. Keep your fingers spread and your palms grounded. You should now be in a low lunge with your hands planted inside your front foot.
Phase 3: Deepen the Stretch 🔽
-
Lower to Your Forearms (Intermediate/Advanced). For a deeper stretch, slowly lower your forearms to the mat or onto yoga blocks. Your forearms should be parallel to each other imagine your arms forming the number “11.” If lowering your forearms causes your lower back to round or your front knee to splay out, stay on your hands instead.
-
Lengthen Your Spine. Gently reach your chest forward, as if you’re trying to peek through a doorway. This keeps your spine long and prevents you from collapsing into your lower back. Think of lengthening from your tailbone all the way through the crown of your head.
-
Soften and Sink. Now, the real work begins—relaxation. With each exhale, imagine your hips melting toward the mat like butter softening on warm toast. Don’t force it; let gravity and your breath do the heavy lifting. You should feel a deep stretch in your right hip flexor and groin.
Phase 4: Breathe, Hold, and Exit 🌬️
-
Hold and Breathe. Stay in the pose for 3–5 deep breaths (beginners) or up to 60 seconds (intermediate/advanced). Breathe slowly and steadily through your nose. If your breath becomes shallow or choppy, you’ve gone too deep; back off slightly.
-
Release Gently. To exit, press firmly through your palms and lift your chest. Tuck your back toes and lift your back knee off the mat. Step your right foot back to meet your left, returning to Downward-Facing Dog. Take a moment to notice the difference between your right and left hips.
-
Repeat on the Left Side. Complete the same sequence on your left side. Remember, your body may feel different from one side to the other; that’s completely normal and nothing to worry about.
🛠️ Modifications for Every Body:
-
Beginners: Keep your back knee on the ground and stay on your palms instead of forearms. Place yoga blocks under your hands to bring the floor closer to you. You can also practice with your front foot closer to your body for a milder stretch.
-
Advanced: Lower your forearms to the floor for maximum depth. For a quad stretch, bend your back knee and reach back with the opposite hand to catch your foot (Twisted Lizard). You can also lift your chest and reach your heart forward for a more active variation.
🦎 Direct Lizard Pose Variations
These are modifications and advanced versions of the Lizard Pose you already know:
-
Twisted Lizard Pose (Parivrtta Utthan Pristhasana): From Lizard Pose, bend your back knee and reach back with the opposite hand to catch your foot, twisting your chest open. This adds a quad stretch and spinal twist to the deep hip opener .
-
Flying Lizard Pose: An arm balance variation. From Lizard Pose, hook your front knee over your same-side elbow, shift your weight forward, and hover your front foot and back leg off the mat. It requires significant core strength and balance .
-
Active Lizard Pose: Keep your back knee lifted off the floor and crawl your upper body forward to intensify the hip stretch without lowering your forearms .
-
Revolved Lizard Pose: Lift your torso upright and twist your upper body toward the side of your front leg, reaching your arms to the sky .
🧘 Complementary Hip Openers
If Lizard Pose is working for you, these poses target similar areas (hip flexors, groin, hamstrings) and are often sequenced together:
-
Low Lunge (Anjaneyasana): The foundation for Lizard Pose. It stretches the hip flexors of the back leg and is a gentler starting point before stepping the front foot out wide .
-
Pigeon Pose (Kapotasana): Another deep hip opener that externally rotates the front hip while stretching the back hip flexor. Many teachers offer Pigeon as an alternative or follow-up to Lizard .
-
Half Splits (Ardha Hanumanasana): Often entered from a Low Lunge. It targets the hamstrings of the front leg while keeping the hip flexor stretch in the back leg—a great complement to Lizard’s groin focus .
-
Frog Pose (Mandukasana): A more intense inner-thigh and groin opener. If Lizard Pose feels like it’s not deep enough for your adductors, Frog is the next step .
💡 How They Fit Together
A common flow is: Low Lunge → Half Splits → Lizard Pose → Twisted Lizard, or swapping Lizard for Pigeon Pose if your body prefers external rotation over the wide groin stretch. Each pose offers a slightly different angle on the hips, which is why they’re often paired in hip-focused sequences
Quick Reference Table 📊
| Muscle Groups Worked | Difficulty Level |
|---|---|
| Hip Flexors, Groin, Hamstrings, Quadriceps, Glutes; Shoulders & Core (stabilization) | Intermediate (with beginner and advanced options) |
Common Mistakes to Avoid ❌
-
Bouncing or Forcing the Hips Down: This can strain the hip joint and lower back. Let gravity and deep breathing do the work over time.
-
Letting the Front Knee Collapse Inward: This puts unnecessary stress on the knee joint. Actively press into the outer edge of your front foot to keep the knee aligned.
-
Rounding the Back: This usually means you’ve gone past your current range of motion. It’s better to use blocks and keep a flat back than to sink deep with a curved spine.
-
Ignoring the Back Leg: Don’t let your back leg be lazy. If it’s lifted, engage it by reaching through the heel. If it’s down, keep length through the front of the hip.
FAQs 💬
Q: What does Lizard Pose actually stretch?
A: It’s a multi-tasking stretch. Its primary focus is the hip flexors and groin, but it also deeply stretches the hamstrings and quadriceps. Plus, it strengthens your core and shoulders while you hold it.
Q: Is Lizard Pose okay for tight hips?
A: Yes, absolutely—but you need to modify. Tight hips are exactly why you should do it. Start with your back knee down and hands on blocks. This supports your body and lets the hips open gradually without strain.
Q: How long should I hold Lizard Pose?
A: Listen to your body. For a dynamic warm-up, 3–5 breaths per side is great. For a deep, passive stretch, aim for 30–60 seconds per side. Just remember to breathe steadily throughout.
Q: Can I do Lizard Pose every day?
A: It’s generally safe daily if you’re not pushing to your absolute maximum depth every time. However, intense stretching can be taxing, so it’s wise to alternate between deeper stretches and gentler mobility work. If you’re sore, take a rest day.
Quick Tips & Safety Tricks 🛡️
-
Use Props: A folded blanket under your back knee is a game-changer for comfort on hard floors. Yoga blocks under your hands or elbows allow you to maintain a long spine without forcing depth.
-
Mind the Front Knee: Keep your front knee tracking in line with your toes. If it collapses inward, widen your stance or shorten your step.
-
Keep the Spine Long: If you feel your back rounding as you lower down, you’ve gone too far. Back off and raise your hands onto blocks. A long spine is more productive than a collapsed deep fold.
-
Breathe, Don’t Force: The name of the game is flexibility, not force. If you’re holding your breath, you’re pushing too hard. Ease in gradually.