Introduction
Welcome to the low lunge pose, a foundational yoga posture that is so much more than just a stretch. Often called Anjaneyasana, this pose is a powerful full-body opener that targets the often-neglected hip flexors, which can become incredibly tight from hours of sitting. Think of it as a key that unlocks not only your hips but also your chest and shoulders, promoting better posture and a sense of grounded energy. Whether you’re looking to improve your flexibility, build lower-body strength, or find a moment of calm, the low lunge is your go-to pose.
To truly maximize your hip-opening practice, consider pairing it with a Frog pose Stretch, which deeply targets the inner thighs and groin, complementing the front-hip focus of low lunge for a complete release. Together, they form a powerful duo that addresses hip tension from every angle.
As a core component of yoga poses, low lunge sequences, and a staple in many lunges workout routines, this pose delivers incredible benefits. This pose is a true “multi-tasking marvel” that can transform your physical and mental well-being from your very first attempt.
Key Benefits 🌈
Flexibility isn’t just about touching your toes; it’s about creating space in your body and mind. Here’s what the low lunge stretch can do for you:
-
Deep Hip and Thigh Opening: Provides an intense, targeted stretch for your hip flexors and quadriceps, counteracting the effects of prolonged sitting . This is one of the best lunges exercise for releasing tension in the front body.
-
Strengthens Lower Body: Engages and strengthens your quads, hamstrings, glutes, and calves. Holding the low lunge yoga pose actively builds functional leg strength and stability.
-
Boosts Balance and Core Stability: The pose requires focused core engagement to keep you upright and balanced, which also helps improve your overall body awareness and posture.
-
Energizes and Opens the Chest: By lifting your torso and arms, you expand the chest, improve lung capacity, and stimulate your heart chakra, creating a feeling of energy and openness.
-
Relieves Sciatica and Lower Back Pain: The deep stretch in the hips and glutes can offer therapeutic benefits, helping to alleviate pain associated with sciatica.
Step-by-Step Instructions 📝
Follow these steps to practice the low lunge yoga pose with proper form. Remember to move with your breath and listen to your body.
The Setup:
Start in Downward-Facing Dog (Adho Mukha Svanasana) . Exhale and step your right foot forward between your hands, placing it just beside your right hand.
The Pose:
-
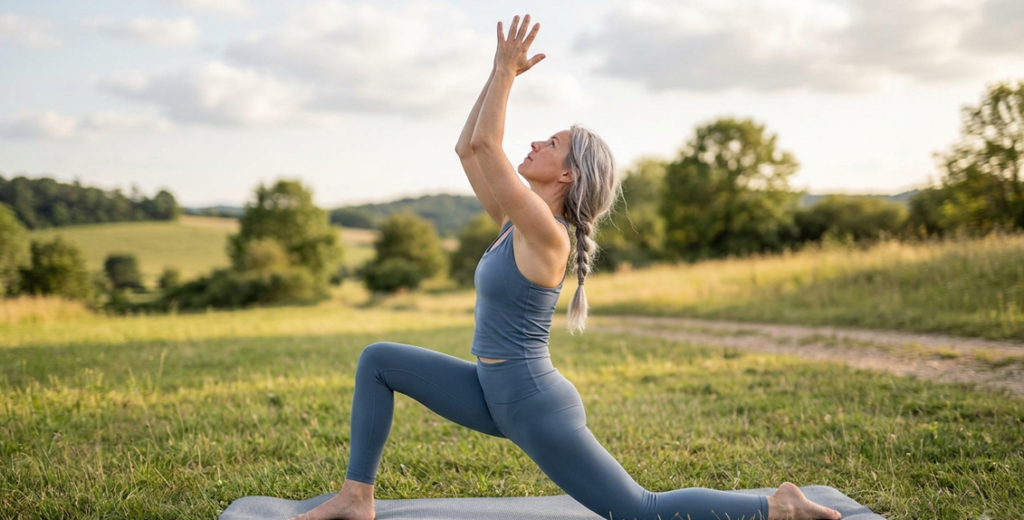
Lower Your Back Knee: Gently lower your left knee to the floor, keeping the top of your left foot flat on the mat .
-
Align and Slide: Slide your left knee back until you feel a comfortable stretch in the front of your left thigh and hip. Keep your right knee stacked directly over your right ankle, creating a 90-degree angle .
-
Engage Your Core: Inhale and lift your torso upright. Draw your belly button in and up to support your lower back .
-
Lift Your Arms: Sweep your arms out to the sides and up towards the ceiling, bringing your palms to face each other. This opens the chest and deepens the pose .
-
Square Your Hips: Imagine your hip points are headlights. Gently draw your left hip forward and your right hip back to square them toward the front of your mat. This protects your lower back .
-
Hold and Breathe: Gaze softly forward or slightly upward. Hold the low lunge for 5-10 deep, steady breaths, feeling the stretch deepen with each exhalation .
-
Release: To release, exhale and place your hands back on the mat. Step your right foot back to return to Downward-Facing Dog. Repeat on the left side.
🔄 Modifications
-
For Beginners: Place your hands on your hips or your front thigh for more balance . You can also use yoga blocks under your hands for extra support .
-
For Advanced: Deepen the backbend by gently arching your spine and gazing up. You can also explore a low lunge twist by bringing one hand to your heart and the other to your front knee, twisting your torso open to the side.
-
Chair Alternative: If you have knee issues, you can practice a variation seated in a chair: lift one knee towards your chest, holding it with your hands to get a gentle hip stretch.
Quick Reference Table 📊
| Muscle Groups Worked 🦵 | Difficulty Level 📈 |
|---|---|
| Primary: Hip Flexors, Quadriceps, Hamstrings, Glutes | Beginner-Friendly |
| Secondary: Core, Calves, Psoas, Chest, Shoulders | (With modifications available for all levels) |
Safety & Common Mistakes ⚠️
Avoid injury and get the most out of your low lunge pose by keeping these tips in mind.
Safety Tricks 🛡️
-
Cushion Your Knee: Place a folded blanket or towel under your back knee to protect the joint and make the pose more comfortable .
-
Warm Up First: Prepare your body with a few rounds of Sun Salutations or other dynamic stretches like Reverse Lunges to warm up your muscles before holding the static stretch .
-
Protect Your Knee: Avoid letting your front knee cave inward. Actively press your knee outwards to track over your second and third toes .
-
The Knee-Over-Ankle Myth: While many cues tell you to keep your knee aligned over your ankle, some experts note that it’s not a rigid rule for everyone with healthy knees. The key is to feel a stable, comfortable stretch, not joint pain .
Common Mistakes 🚫
-
Dumping Weight in the Front Leg: Instead of sinking all your weight into your front hip, engage your core and press down through your back foot to create a lift in your torso.
-
Straining the Lower Back: If you are arching your back excessively, it could be a sign that your hip flexors are too tight. Instead of pushing through, keep your torso more upright and work on your flexibility gradually .
-
Letting the Hips Open: As you step into the pose, your back hip might want to swing open. Focus on keeping your hips squared to the front of the mat for a safer, deeper stretch .
-
Going Too Deep Too Fast: Don’t force the deep lunge, especially if you have knee concerns. Listen to your body and only go as deep as feels good. A more shallow lunge is better than a painful one that could cause injury
FAQs
Q1: Is the low lunge good for sciatica pain?
A: Yes, it can be incredibly beneficial! The low lunge stretches deeply targets the hip flexors and glutes, which are often tight and contribute to sciatic nerve compression. By releasing tension in these areas, the low lunge pose can help alleviate pressure on the sciatic nerve. However, always listen to your body if you feel sharp pain, ease out of the pose gently or try a modified version with your hands on blocks.
Q2: How long should I hold a low lunge?
A: For a static stretch, aim to hold the low lunge yoga pose for 5 to 10 deep breaths (about 30-60 seconds). This duration allows your muscles to release gradually and your nervous system to relax into the stretch. For a more dynamic approach, you can flow in and out of the pose with your breath, holding for just 1-2 breaths per side as part of a lunges workout .
Q3: Can beginners do the low lunge pose?
A: Absolutely! The low lunge pose is considered beginner-friendly. The key is to use modifications. Place your hands on your front thigh, your hips, or on yoga blocks for support. You can also keep your back knee down and focus on squaring your hips rather than going deep into a backbend. It’s all about finding the version that feels good for your body today .
Q4: What’s the difference between a high lunge and a low lunge?
A: The main difference is the back leg. In a high lunge, the back heel is lifted and the back leg is straight, creating a more dynamic, balance-intensive pose. In a low lunge, the back knee rests on the floor, offering more stability and a deeper, more passive stretch in the hip flexors and quadriceps of the back leg. The low lunge is often used as a resting or deeper stretching pose in yoga poses low lunge sequences.
Q5: Can I do the low lunge if I have knee pain?
A: With caution, yes. To protect your knees, always place a folded blanket or towel under your back knee. Ensure your front knee stays stacked over your ankle and does not extend past your toes. If knee pain persists, try a supported version by placing a block under your hands or practice a chair variation (lifting one knee towards your chest while seated). Avoid the pose if it causes sharp or stabbing pain.
Quick Pro Tips: Your 30-Second Cheat Sheet ⚡
-
🔥 Focus on the Back Leg: The magic of the low lunge yoga pose happens in the back leg. Actively press the top of your back foot into the mat to deepen the quad and hip flexor stretch and protect your front knee.
-
💪 Engage Your Core: Don’t let your belly hang loose! Draw your navel in and up. This supports your lower back, helps you balance, and even intensifies the stretch by tilting your pelvis forward.
-
🧘 Square Your Hips: Imagine your hip bones are headlights. Gently draw your back hip forward and your front hip back. This simple action protects your sacrum and ensures the stretch hits the right muscles.
-
🌬️ Breathe Into the Stretch: On each exhalation, consciously relax your muscles and try to sink a little deeper into the low lunge stretch. Your breath is your best tool for releasing tension and increasing flexibility safely.
-
🔄 Add a Twist for Extra Benefits: For an advanced variation, try a low lunge twist. From your lunge, bring one hand to your heart and the other to your front knee, twisting your torso open. This adds a spine twist that aids digestion and enhances spinal flexibility.