Introduction: Why You Need This Deep Hip Opener
If you spend hours sitting at a desk or driving, your hips might feel like a rusty door hinge that hasn’t been oiled in years. Enter the Lizard Pose (Utthan Pristhasana), a deep, grounding stretch that targets the hip flexors, hamstrings, and groin. Unlike a simple Low Lunge, this lizard yoga pose brings your forearms to the floor (or blocks), allowing gravity to do the work of opening your hips. It is a staple in lizard pose yoga sequences because it effectively releases tension stored in the lower body, paving the way for improved flexibility.
✨ Key Benefits of Lizard Pose
Practicing this intense hip opener offers more than just physical release; it’s a full-body reset. Here is what you can expect:
-
Deep Hip Flexor Release: It stretches the psoas and quadriceps, which is essential for anyone who sits for a living.
-
Groin & Hamstring Opener: It targets the adductors (inner thighs) and hamstrings, helping to balance out tightness caused by running or cycling.
-
Prepares for Advanced Poses: It acts as a gateway to deeper flexibility by warming up the hips for postures like Frog Pose or Pigeon Pose.
-
Stress Relief: Deep hip openers are known to release stored emotional tension, helping to calm the mind and nervous system.
-
Spinal Decompression: Because you are lengthening the spine forward, it creates space between the vertebrae, offering relief from lower back tightness.
📝 Step-by-Step Instructions
Follow these steps to safely enter the lizard pose in yoga. Remember, consistency is key to building flexibility.
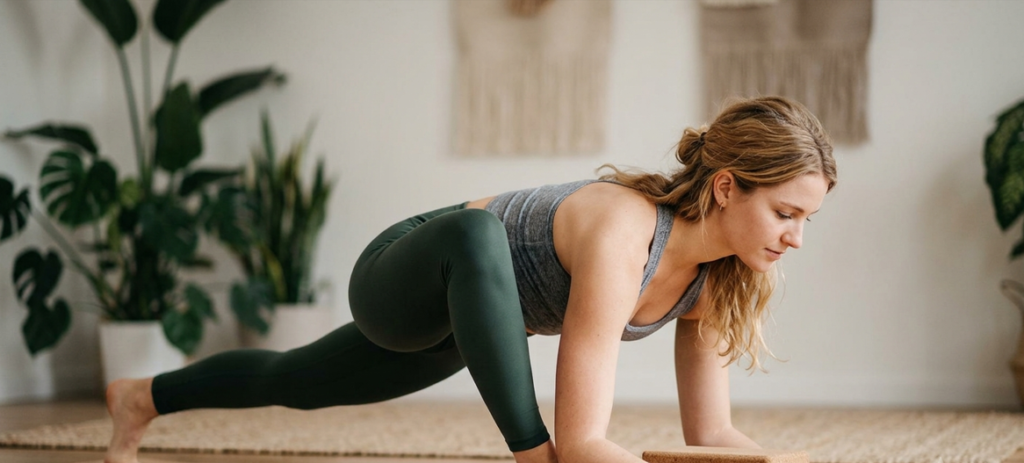
- Start in Downward-Facing Dog: From your mat, exhale and step your right foot forward to the outside of your right hand (like a Low Lunge but wider). Keep your back heel lifted and your core gently engaged. This transition sets the foundation for the entire pose, so take your time there is no prize for rushing.
- Lower Your Base: Slowly lower your left knee to the mat. Ensure your right knee is tracking over your ankle or slightly outward. Think of your front knee like a car wheel it should point in the same direction as your toes, never caving inward. If your knee feels pinched, widen your stance or bring your foot closer to your hand.
- Walk It Out: Walk your right foot toward the edge of your mat (about 45 degrees) to create space for your torso. This small adjustment prevents your hip from feeling jammed and allows your body to settle deeper into the stretch. Think of it like opening a door wider so more light can come in the more space you create, the more room your hips have to release.
- Come Down to Forearms: Slowly lower your forearms to the mat or a yoga block. If your hips are tight, keep your hands on blocks or your front thigh. Avoid forcing your way down let gravity and your breath do the heavy lifting. Imagine your body sinking into the pose like a ship gently lowering its anchor, rather than crashing down all at once.
- Lengthen the Spine: Gaze forward or slightly down. Keep your neck long and relax your shoulders away from your ears. Think of your spine as a string being gently pulled forward from the crown of your head. This forward lengthening is what transforms the pose from a simple Low Lunge into a powerful hip opener that builds flexibility without compressing your lower back.
- Breathe & Hold: Stay here for 5–10 deep breaths. With every exhale, imagine your hips melting toward the floor. If your mind starts to wander (and it will!), gently bring your attention back to the sensation in your hips and the rhythm of your breath. This mindful breathing is where the real flexibility magic happens tight muscles need calm signals from the nervous system to release.
- Switch Sides: To exit, lift your torso, step your right foot back to Downward-Facing Dog, and repeat on the left side. Notice any differences between your right and left hips most people are tighter on one side, and that is completely normal. Give the tighter side a little extra love and time if needed.
- 🧘 Take a Counterpose: After completing both sides, rest in Child’s Pose or Butterfly Stretch for a few breaths. This helps your hips and lower back reset after the intense opening. It also gives you a moment to notice how your body feels often you will feel lighter, looser, and more grounded.
🌱 Modifications:
- Beginner: Keep your back knee down and place your hands on blocks (or the floor) instead of forearms. You can also keep the front knee bent. If you are brand new to this pose, try it near a wall for extra support, or place a folded blanket under your back knee for cushioning. Remember, there is no rush flexibility is a journey, not a race.
- Intermediate: Lower your forearms to a block or the mat while keeping your back knee down. You can also gently press your hips forward and down to deepen the stretch. This is a great middle ground for those who have some experience with Low Lunge or Pigeon Pose but are not quite ready for the full expression.
- Advanced: Bend your front knee and grab your foot with your hand (like a mermaid) to deepen the quad stretch, or straighten your front leg for a hamstring focus. You can also add a gentle twist by reaching your opposite arm toward the ceiling or interlacing your hands behind your back. These variations are excellent prep for deeper postures like Frog Pose and Pigeon Pose, and they will challenge your flexibility in new and exciting ways.
🔄 Transitioning to Other Poses:
-
To Pigeon Pose: From Lizard Pose, simply slide your front foot toward the opposite side of your mat and lower your hips down. The hip-opening work you just did makes this transition smoother.
-
To Frog Pose: After Lizard Pose, come to all fours and gradually widen your knees. Your hips will already be warmed up and ready for this deeper groin stretch.
-
To Butterfly Stretch: Sit down and bring the soles of your feet together. This gentle counterpose helps release any residual tension from the deep lunge.
🧘 Props to Try:
-
Yoga Blocks: Place one or two blocks under your forearms to bring the floor closer to you.
-
Blanket: Fold a blanket under your back knee to protect it from hard floors.
-
Bolster: Rest your forearms on a bolster for a more restorative, supported variation.
-
Strap: Loop a strap around your front foot if you cannot reach it with your hand in the advanced variation.
⏱️ Hold Times by Level:
-
Beginner: 3–5 breaths (about 20–30 seconds) per side
-
Intermediate: 5–8 breaths (about 30–45 seconds) per side
-
Advanced: 8–12 breaths (about 60–90 seconds) per side
🕒 Best Time to Practice:
Lizard Pose is best practiced after a gentle warm-up, such as a few rounds of Sun Salutations or a Low Lunge sequence. It is also excellent after a long day of sitting, as it directly counteracts the tightness that builds in your hips and lower back. Avoid doing this pose cold your muscles need warmth to stretch safely.
📊 Quick Reference Table
| Muscle Groups Worked | Difficulty Level |
|---|---|
| Hip Flexors (Psoas), Hamstrings, Groin (Adductors), Quadriceps, Glutes | Intermediate to Advanced |
⚠️ Safety Tricks & Common Mistakes
🛡️ Safety Tricks:
-
Use Props: Do not be a hero. Place blocks under your forearms to bring the floor closer to you.
-
Protect the Knee: Always place a blanket or towel under your back knee for padding.
-
Engage the Core: Gently draw your belly button in to support your lower back.
-
Listen to Your Body: Sensation is good; sharp pain is not. Back off if you feel pinching in the knee or hip.
🚫 Common Mistakes:
-
Letting the Front Knee Cave In: Keep the front knee tracking in line with your toes (or slightly out) to avoid strain.
-
Rounding the Lower Back: Focus on lengthening the spine forward rather than collapsing downward.
-
Holding Your Breath: It is tempting to hold your breath during intense stretches. Keep breathing deeply to help your muscles relax into the flexibility gains.
-
Skipping Warm-Up: Never jump into Lizard Pose cold. Do a few Sun Salutations or a Butterfly Stretch first.
❓ FAQs
Q: Is Lizard Pose the same as Frog Pose?
A: No. While both open the hips, Lizard Pose is a lunge variation (one leg forward, one back), whereas Frog Pose is a symmetrical squatting position on all fours.
Q: Can I do Lizard Pose if I have tight hamstrings?
A: Absolutely. If your hamstrings are tight, keep your front knee bent and focus on the hip flexor stretch rather than trying to straighten the leg.
Q: How is this different from Pigeon Pose?
A: Pigeon Pose is a external rotation stretch (shin parallel to the mat), while Lizard Pose is more of a linear lunge that focuses on the hip flexors and groin.
Q: How long should I hold the pose?
A: Aim for 5 to 10 deep breaths (about 30–60 seconds) per side. For deeper flexibility work, you can hold up to 2 minutes.
💡 Quick Tip
Stack your joints for safety! If your front knee hurts, adjust your foot placement. The knee should never feel twisted or pinched. Use a block under your hand to lift the floor to you this allows your hips to relax rather than strain.